The Ultimate Guide to Perfectly Juicy Air Fryer Chicken Breast Every Time
Have you ever pulled a chicken breast out of the air fryer only to find it dry, rubbery, or undercooked in the middle? You are not alone. Mastering the Air Fryer Chicken Breast is a game-changer for busy home cooks who crave juicy, flavorful protein without spending hours in the kitchen. Preparing this recipe at home saves money, reduces sodium compared to takeout, and puts you in complete control of seasoning and doneness. Whether you are meal-prepping for the week or whipping up a quick dinner, this guide will transform your chicken game using your favorite countertop appliance.
Ingredients & Kitchen Tools
For the Chicken:
– 2 boneless, skinless chicken breasts (about 6–8 oz each) – pound to even thickness for uniform cooking
– 1 tablespoon olive oil or avocado oil – helps browning and prevents sticking
– 1 teaspoon garlic powder
– 1 teaspoon smoked paprika – adds color and subtle smokiness
– ½ teaspoon onion powder
– ½ teaspoon salt
– ¼ teaspoon black pepper
Optional for extra flavor:
– 1 tablespoon lemon juice or apple cider vinegar – for marinade
– 1 teaspoon dried oregano or Italian seasoning
Kitchen Tools:
– Air fryer (basket style works best)
– Meat mallet or rolling pin – for pounding
– Instant-read thermometer – non-negotiable for perfect doneness
– Tongs
– Small bowl for seasoning mix
– Cutting board
Substitutions: Swap paprika for cayenne (spicy), use coconut aminos instead of salt (low-sodium), or sub chicken thighs for breasts (adjust time by 2–3 minutes).
Prep Time & Cooking Schedule
Prep Time: 10 minutes (including pounding and seasoning)
Marinating Time (optional): 15–30 minutes – allows flavors to penetrate
Cook Time: 12–15 minutes at 380°F (193°C)
Resting Time: 5 minutes – critical for juice redistribution
Total Time: Approximately 30 minutes
Plan ahead: If marinating, start 20 minutes before cooking. The actual air frying is faster than preheating a conventional oven, making this ideal for weeknight meals.
Step-by-Step Instructions
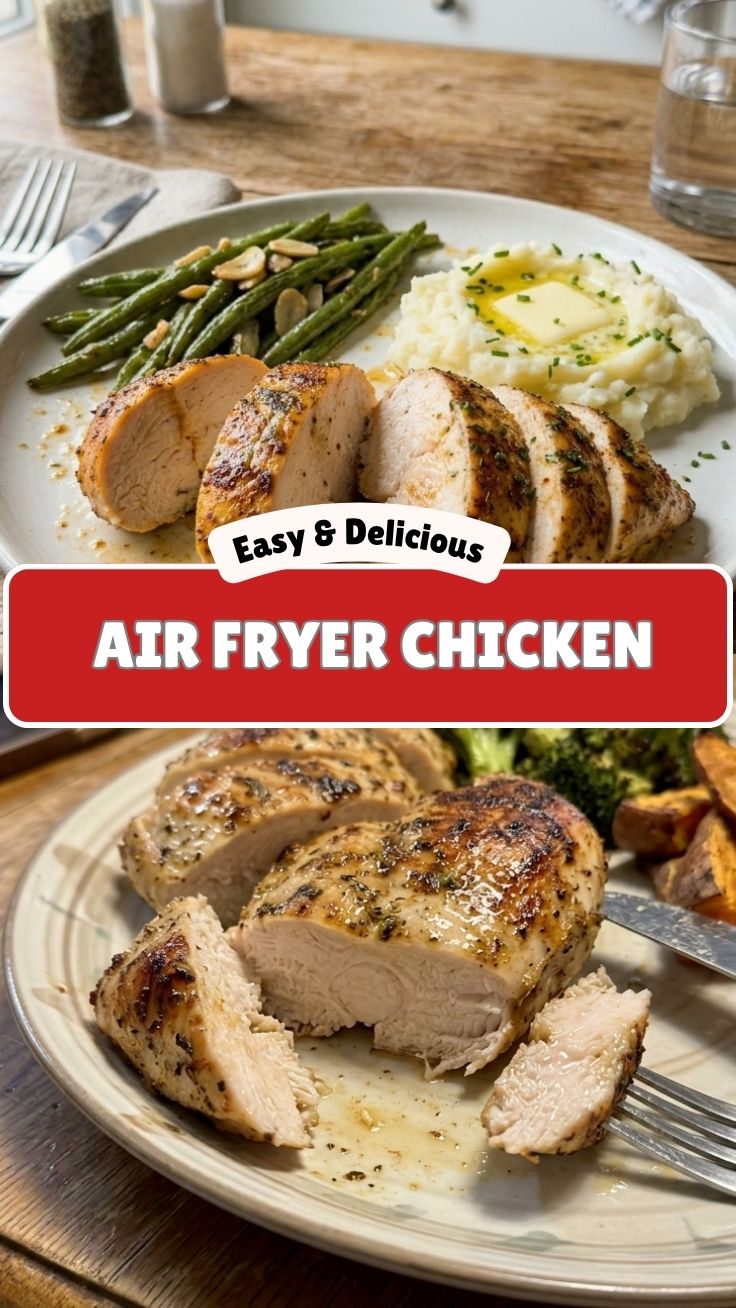
1. Prep the chicken: Place chicken breasts between two sheets of plastic wrap. Pound to an even ¾-inch thickness using a meat mallet. This ensures the Air Fryer Chicken Breast cooks uniformly and stays tender.
2. Season perfectly: In a small bowl, mix garlic powder, smoked paprika, onion powder, salt, and pepper. Pat chicken dry with paper towels, then brush both sides with oil. Sprinkle seasoning evenly over all surfaces, rubbing it in gently.
3. Preheat air fryer: Set air fryer to 380°F (193°C) for 3 minutes. Preheating creates an immediate sear, locking in moisture.
4. Air fry: Place chicken breasts in a single layer in the basket, leaving space between pieces. Cook for 6 minutes, then flip using tongs. Cook another 6–9 minutes, depending on thickness. The internal temperature must reach 165°F (74°C) at the thickest part. For extra crunch, spray a light mist of oil during the last 2 minutes to achieve that crispy air fryer chicken exterior.
5. Rest and serve: Transfer chicken to a cutting board, tent loosely with foil, and rest for 5 minutes. This step redistributes juices, preventing dryness when sliced. Slice against the grain for maximum tenderness.
Pro tip: If your air fryer runs hot, reduce temperature to 370°F and add 1–2 minutes. Always rely on a thermometer, not timing alone.
Nutritional Benefits & Advantages
Chicken breast is a lean protein powerhouse, offering about 25–30 grams of protein per 3-ounce serving with minimal saturated fat. Cooking in the air fryer requires significantly less oil than pan-frying – you use just 1 tablespoon total compared to ¼ cup for shallow frying. This reduces calories by roughly 50–70 per serving while still delivering a satisfying golden crust. The high heat and circulating air also help render excess fat, making the dish suitable for keto, paleo, and low-carb diets. Additionally, the quick cooking time helps retain B vitamins (B3, B6) that can degrade with prolonged heat exposure.
Tips Variations & Cooking Advice
Flavor Boosters:
– Lemon Herb: Add zest of 1 lemon and 1 teaspoon dried thyme to the seasoning mix.
– Spicy Cajun: Replace paprika with 1 tablespoon Cajun seasoning and add ¼ teaspoon cayenne.
– Asian Glaze: Brush chicken with 2 tablespoons soy sauce + 1 tablespoon honey during the last 3 minutes.
Alternative Methods:
– Coat in almond flour for a gluten-free crunchy crust (spray with oil before cooking).
– Use chicken thighs – adjust time to 18–20 minutes at 380°F.
– Double batch – ensure pieces don’t overlap; cook in two batches if needed.
Dietary Adaptations:
– Dairy-free: Already dairy-free as written.
– Whole30: Use compliant seasonings and avocado oil.
– Low-sodium: Omit salt and rely on herbs, garlic, and lemon.
Common Mistakes to Avoid
| Mistake | Solution |
|———|———-|
| Skipping pound step | Uneven thickness causes dry edges and raw centers. Pounding ensures even cooking. |
| Overcrowding the basket | Steam replaces crisp air, leading to soggy skin. Leave ½-inch between pieces. |
| Not flipping halfway | Bottom side stays pale and undercooked. Flip at 6 minutes for even browning. |
| Cooking from cold | Room temp chicken cooks more evenly. Let sit 10 minutes after seasoning. |
| Guessing doneness | Visual cues fail with chicken. Always use a thermometer; 165°F is non-negotiable. |
Storage & Meal Prep Tips
Refrigeration: Store cooled chicken in an airtight container for up to 4 days. Keep whole or slice just before eating to retain moisture.
Freezing: Wrap individually in plastic wrap, then foil, and freeze for up to 3 months. Thaw overnight in the fridge.
Reheating: Air fry at 350°F for 3–4 minutes (flip halfway) to restore crispness. Avoid microwave, which turns the exterior rubbery. For shredded chicken, reheat in a skillet with a splash of broth.
Meal prep: Cook 4–6 breasts at once (in batches), slice, and portion into containers with roasted veggies and quinoa for ready-to-eat lunches.
Conclusion
Mastering the Air Fryer Chicken Breast is about understanding temperature, timing, and technique – not luck. By pounding evenly, seasoning generously, and resting properly, you can achieve juicy, flavorful results every time. This method also delivers that satisfying crispy air fryer chicken texture without deep frying. Try this recipe tonight, and once you experience the ease and consistency, you will wonder why you ever used the oven. Share your creations in the comments or tag us on social media – we love seeing your golden-brown victories!
FAQs
Q: Can I use frozen chicken breasts directly in the air fryer?
A: Yes, but increase cook time to 20–25 minutes at 360°F. Check internal temperature at 20 minutes and continue in 2-minute increments. The texture will be slightly less tender than fresh.
Q: Why is my air fryer chicken breast dry even though I followed the times?
A: Two common culprits: your air fryer runs hot (reduce temp by 10–15°F) or the chicken was overcooked by even 2 degrees. Remove at 163–164°F; carryover cooking will bring it to 165°F.
Q: Can I use bone-in chicken breasts?
A: Absolutely. Increase cook time to 20–25 minutes at 370°F. Use a thermometer inserted near the bone (but not touching it) and cook to 165°F. The bone adds flavor but requires longer cooking.
Q: How do I get a thicker, crunchier crust?
A: After seasoning, dip chicken in beaten egg, then coat with panko breadcrumbs (or crushed pork rinds for keto). Spray generously with oil and air fry at 380°F for 14–16 minutes, flipping once.
Q: Can I add a sauce after cooking?
A: Yes, but add it after resting to avoid sogginess. Toss in buffalo sauce, teriyaki glaze, or a creamy Dijon sauce right before serving.
Best way to grow perfect Air Fryer Chicken Breast in 22 minutes
Ingredients
Equipment
Method
- Pat the chicken breasts dry with paper towels to ensure a crispy exterior.
- In a small bowl, mix together the olive oil, paprika, garlic powder, onion powder, salt, and black pepper to create a seasoning blend.
- Rub the seasoning mixture evenly all over the chicken breasts, ensuring they are fully coated.
- Preheat your air fryer to 375°F (190°C) for 3-5 minutes.
- Place the seasoned chicken breasts in the air fryer basket in a single layer, ensuring not to overcrowd it; if necessary, cook in batches.
- Cook for 10 minutes, then flip the chicken breasts and continue to cook for another 7-10 minutes, or until the internal temperature reaches 165°F (74°C).
- Once cooked, remove the chicken from the air fryer and let it rest for 5 minutes before slicing and serving.