The Ultimate Homemade Comfort: Unveiling the Creamiest Baked Mac and Cheese
Ever wondered what makes a truly unforgettable comfort food? It’s often the blend of rich ingredients, a touch of personal flair, and the simple joy of sharing something delicious. Today, we’re diving into the world of homemade Baked Mac and Cheese, a dish that transcends mere sustenance to become a warm hug on a plate. Forget the boxed versions; crafting this classic at home allows for unparalleled customization and a depth of flavor that’s simply unmatched. We’ll be focusing on achieving that perfect golden crust and an impossibly smooth sauce, largely thanks to the generous inclusion of luscious Cheddar cheese. This guide will empower you to create a mac and cheese masterpiece, turning a simple meal into a memorable culinary experience.
Ingredients & Kitchen Tools
To embark on your cheesy adventure, gather these essential items:
- Elbow Macaroni (1 lb): The quintessential pasta for mac and cheese, its curves hold the sauce beautifully. Other short pasta shapes like cavatappi or shells also work well.
- Whole Milk (4 cups): Provides the creamy base for our béchamel sauce. For a richer flavor, you can substitute 1 cup with heavy cream.
- Unsalted Butter (1/2 cup / 1 stick): Forms the roux, the foundation of a thick, velvety sauce.
- All-Purpose Flour (1/2 cup): The other half of the roux, helping to thicken the milk.
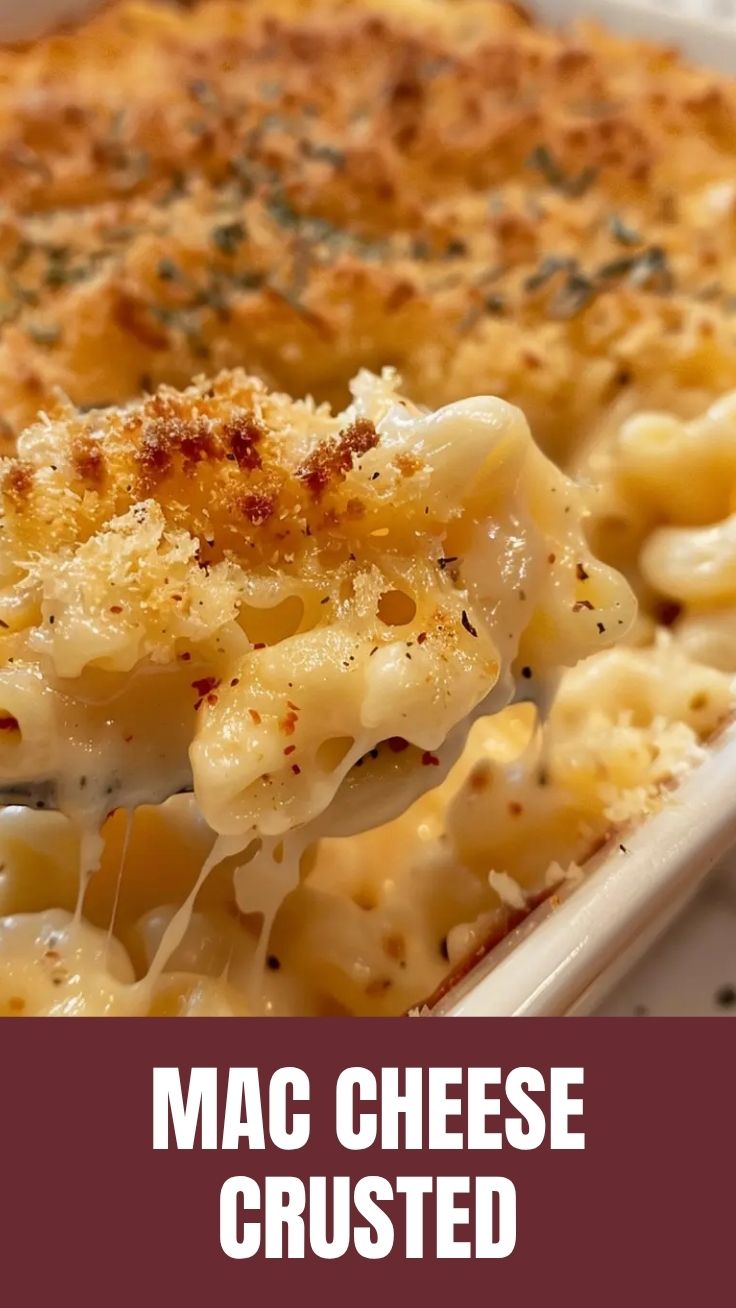
- Sharp Cheddar cheese (4 cups, freshly grated): The star of the show. Freshly grated melts more smoothly and provides superior flavor compared to pre-shredded.
- Gruyere or Fontina Cheese (2 cups, freshly grated, optional): Adds a complex, nutty depth to the cheese blend. Feel free to experiment with other melting cheeses like smoked gouda for unique flavor profiles.
- Nutmeg (1/2 teaspoon, freshly grated preferred): A secret ingredient that enhances the cheesy flavor without being overpowering.
- Dijon Mustard (1 teaspoon): A touch of tang that brightens the sauce and complements the cheese.
- Salt (to taste): Essential for balancing flavors. Start with 1 teaspoon and adjust.
- Black Pepper (to taste): Adds a subtle kick.
- Panko Breadcrumbs (1 cup, optional): For that irresistible crispy topping. Regular breadcrumbs or crushed butter crackers can also be used.
- Cooking Oil Spray or Butter: For greasing the baking dish.
Kitchen Tools:
- Large Pot: For cooking pasta.
- Large Saucepan or Dutch Oven: For making the cheese sauce.
- Whisk: Essential for a lump-free roux and smooth sauce.
- Grater: For freshly grating your cheeses.
- 9×13 inch Baking Dish: The perfect size for a generous casserole.
- Measuring Cups and Spoons: For accurate ingredient portions.
- Spatula or Wooden Spoon: For stirring.
Prep Time & Cooking Schedule
- Prep time: 20 minutes
- Cook time: 25-30 minutes (baking)
- Resting time: 10 minutes (after baking)
This timeline allows you to prepare the components efficiently. While the pasta cooks, you can grate your cheeses and start on the béchamel. The resting time after baking is crucial for the casserole to set, preventing a watery consistency when serving.
Step-by-Step Instructions
1. Cook the Pasta: Bring a large pot of salted water to a rolling boil. Add the elbow macaroni and cook according to package directions until al dente (slightly firm to the bite). Drain well and set aside. Do not rinse the pasta; the starch helps the sauce adhere.
2. Make the Roux: In a large saucepan or Dutch oven over medium heat, melt the unsalted butter. Once fully melted, sprinkle in the all-purpose flour. Whisk continuously for 1-2 minutes until a smooth paste forms and cooks, taking on a light golden color. This is your roux, the thickening agent for your glorious Baked Mac and Cheese.
3. Create the Béchamel: Gradually whisk in the whole milk to the roux, pouring slowly to avoid lumps. Continue whisking constantly until the mixture thickens and comes to a gentle simmer, about 5-7 minutes.
4. Melt the Cheese: Reduce the heat to low. Add the freshly grated sharp Cheddar cheese (and Gruyere/Fontina if using) to the béchamel. Stir continuously until all the cheese has melted into a smooth, luscious sauce.
5. Season the Sauce: Stir in the nutmeg, Dijon mustard, salt, and black pepper. Taste and adjust seasonings as needed. Remember, the cheese itself is salty, so season gradually.
6. Combine and Bake: Add the cooked macaroni to the cheese sauce and stir gently until every piece is thoroughly coated. Pour the mixture into your greased 9×13 inch baking dish. If using, sprinkle the panko breadcrumbs evenly over the top.
7. Bake to Perfection: Preheat your oven to 375°F (190°C). Bake for 25-30 minutes, or until the top is golden brown and the cheese sauce is bubbly around the edges.
8. Rest and Serve: Remove from the oven and let it rest for 10 minutes before serving. This allows the sauce to set, making for cleaner scoops.
Nutritional Benefits & Advantages
While a truly indulgent dish, homemade mac and cheese offers more than just comfort. Milk and cheese are excellent sources of calcium and vitamin D, crucial for strong bones and overall health. The whole milk provides a good amount of protein, aiding in muscle repair and satiety. Choosing whole-wheat pasta can add fiber to your meal. Making it at home also gives you control over the quality of ingredients, allowing you to opt for organic or grass-fed dairy for added nutritional benefits.
Tips, Variations & Cooking Advice
- Flavor Boosts: Sautéed onions or garlic can be added to the butter before the flour for an aromatic foundation. A pinch of cayenne pepper or smoked paprika can add a subtle warmth.
- Cheese Blends: Don’t limit yourself to just cheddar. Other excellent melting cheeses include Monterey Jack, Gouda, Havarti, or even a touch of cream cheese for extra creaminess.
- Add-ins: Cooked bacon bits, caramelized onions, roasted vegetables (broccoli, cauliflower), or even shredded rotisserie chicken can turn this side dish into a complete meal.
- Gluten-Free: Use your favorite gluten-free pasta and a gluten-free all-purpose flour blend for the roux.
- Dairy-Free: There are excellent plant-based milk and cheese alternatives available that can yield a surprisingly delicious dairy-free version.
- Creamier Sauce: For an even richer sauce, add a few ounces of softened cream cheese or mascarpone along with the other cheeses.
Common Mistakes to Avoid
- Overcooking the Pasta: Mushy pasta will ruin the texture. Cook it to al dente as it will continue to cook slightly in the oven.
- Grating Pre-Shredded Cheese: Pre-shredded cheeses are often coated with cellulose to prevent clumping, which can lead to a grainy or less smooth sauce. Always grate your own for the best results.
- Adding Cold Milk to Hot Roux: This can cause lumps. Ensure your milk is at least room temperature, though slightly warmed is even better.
- Too Much Heat During Cheese Melting: High heat can cause the cheese to separate and become oily. Keep the heat low and stir constantly.
- Not Letting it Rest: Impatience can lead to a soupy first serving. Give it those crucial 10 minutes for optimal consistency.
Storage & Meal Prep Tips
Leftover Baked Mac and Cheese stores wonderfully!
- Refrigeration: Store in an airtight container in the refrigerator for up to 3-4 days.
- Freezing: For longer storage, freeze individual portions in freezer-safe containers for up to 3 months. Thaw overnight in the refrigerator before reheating.
- Reheating: For best results, reheat in the oven at 300°F (150°C) until warmed through, adding a splash of milk to prevent dryness. You can also microwave, but be aware it might not retain the same crispy topping.
Conclusion
Mastering homemade Baked Mac and Cheese is a truly rewarding culinary achievement. By following these steps, you’ll consistently create a dish that’s rich, creamy, and bursting with the savory goodness of premium Cheddar cheese. Embrace the comfort, savor the flavor, and don’t hesitate to personalize it to your taste. Share your mac and cheese triumphs with us in the comments below, or explore our other comfort food recipes for more delicious inspiration!
FAQs
Q1: Can I make the cheese sauce ahead of time?
A1: Yes, you can prepare the cheese sauce up to 2 days in advance. Store it in an airtight container in the refrigerator. Gently reheat it over low heat, whisking constantly, before combining with the pasta and baking.
Q2: My cheese sauce is lumpy. What went wrong?
A2: Lumps usually occur if the milk was added too quickly or if the roux wasn’t fully cooked. To fix it, you can try passing the sauce through a fine-mesh sieve or using an immersion blender to smooth it out before adding the cheese.
Q3: How do I get a really crispy topping?
A3: Ensure your panko breadcrumbs are mixed with a tablespoon or two of melted butter before sprinkling over the top. You can also broil the mac and cheese for the last 2-3 minutes, watching carefully to prevent burning.
Q4: Can I use different types of pasta?
A4: Absolutely! While elbow macaroni is classic, any short, sturdy pasta shape will work well, such as cavatappi, shells, penne, or even rotini.
Q5: Why is my mac and cheese sometimes dry after baking?
A5: This can happen if the pasta was overcooked initially, or if too much liquid evaporated during baking. Ensure your pasta is al dente, and consider adding a little extra milk (about 1/4 cup) to the sauce before baking if you prefer a very moist result.
Best way to grow with 3 Baked Mac and Cheese tips
Ingredients
Equipment
Method
- Preheat your oven to 375°F (190°C) and butter a 9x13 inch baking dish.
- Cook the elbow macaroni according to package directions until al dente, then drain and set aside.
- In a large pot or Dutch oven, melt the butter over medium heat, then whisk in the flour and cook for 1 minute to create a roux.
- Gradually whisk in the milk until smooth, then bring to a simmer, stirring constantly, until the sauce thickens.
- Remove the pot from the heat and stir in the shredded cheddar and Monterey Jack cheeses until melted and smooth, then season with Dijon mustard, salt, and pepper.
- Add the cooked macaroni to the cheese sauce and stir to combine thoroughly.
- Pour the macaroni and cheese mixture into the prepared baking dish and spread evenly.
- In a small bowl, combine the Panko breadcrumbs and grated Parmesan cheese, then sprinkle the mixture evenly over the top of the macaroni and cheese.
- Bake for 25-30 minutes, or until the top is golden brown and bubbly.
- Let the baked mac and cheese rest for 10 minutes before serving to allow it to set.