Unlock the Secret to the Perfect Homemade Cheesecake: A Step-by-Step Guide
Ever wondered if you could create a show-stopping Cheesecake that rivals your favorite bakery, right in your own kitchen? The answer is a resounding yes! There’s an undeniable satisfaction in crafting a delectable dessert from scratch, not just for the joy of baking, but for the quality control and personalized touch you can infuse into every single bite. This comprehensive guide will empower you to master the art of making a luscious Cheesecake, ensuring you impress friends and family with your culinary prowess. Beyond the sheer indulgence, preparing this particular dessert at home allows you to control sugar content, use fresh, high-quality ingredients, and even cater to specific dietary needs. Get ready to embark on a sweet journey!
Ingredients & Kitchen Tools
Crafting the perfect Cheesecake requires a careful selection of ingredients and the right tools. Here’s what you’ll need:
- For the Crust:
* 2 cups Graham Cracker Crumbs: Provides a classic, slightly sweet, and sturdy base. You can make your own by crushing graham crackers or buy pre-made crumbs.
* 1/2 cup Unsalted Butter, melted: Binds the crumbs together, ensuring a firm crust.
* 1/4 cup Granulated Sugar: Adds extra sweetness to the crust.
- For the Filling:
* 32 oz Cream Cheese, softened: Full-fat cream cheese is key for a rich, creamy texture. Softened cream cheese blends smoothly, preventing lumps.
* 1 1/2 cups Granulated Sugar: Sweetens the Cheesecake filling to perfection.
* 1 tsp Vanilla Extract: Enhances the overall flavor profile. Pure vanilla extract is recommended.
* 1/4 cup All-Purpose Flour: A secret ingredient that helps prevent cracking and gives the cheesecake a smooth consistency.
* 1 cup Sour Cream: Adds tanginess and further creaminess, balancing the sweetness.
* 4 Large Eggs: Act as a binder and provide structure to the filling. Room temperature eggs incorporate better.
- Kitchen Tools:
* 9-inch Springform Pan: Essential for easy removal of the finished Cheesecake.
* Food Processor (optional) or Ziploc Bag and Rolling Pin: For crushing graham crackers.
* Large Mixing Bowls (2): For preparing the crust and the filling separately.
* Electric Mixer (stand or hand-held): For achieving a smooth, lump-free cream cheese mixture.
* Rubber Spatula: For scraping down bowls and folding ingredients gently.
* Measuring Cups and Spoons: For accurate ingredient measurements.
* Aluminum Foil: For wrapping the springform pan in a water bath.
Prep Time & Cooking Schedule
Planning is crucial for a perfectly baked Cheesecake. Here’s a typical schedule:
- Prep Time: 30 minutes (includes crust preparation and filling mixing).
- Bake Time: 60-75 minutes (or until the edges are set and the center slightly jiggles).
- Cooling Time (in oven with door ajar): 1 hour (prevents sudden temperature changes that can cause cracking).
- Chilling Time (in refrigerator): Minimum 6 hours, ideally overnight (essential for the Cheesecake to set properly and develop its full flavor and texture).
Remember, a Cheesecake is best enjoyed when fully chilled, so plan accordingly, perhaps starting a day in advance for a special occasion.
Step-by-Step Instructions
Follow these detailed steps to create a flawless Cheesecake that will have everyone asking for your recipe:
1. Preheat Oven & Prepare Pan: Preheat your oven to 325°F (160°C). Tightly wrap the outside bottom and sides of your springform pan with heavy-duty aluminum foil. This prevents water from seeping in during the water bath.
2. Make the Crust: In a medium bowl, combine the graham cracker crumbs, melted butter, and 1/4 cup granulated sugar. Press the mixture firmly and evenly into the bottom of the prepared springform pan. You can use the bottom of a glass for this. Bake for 10 minutes, then remove from oven and let cool slightly while you prepare the filling.
3. Prepare the Filling (Cream Cheese Base): In a large mixing bowl, beat the softened cream cheese with an electric mixer on medium speed until smooth and creamy, about 2-3 minutes. Add the 1 1/2 cups granulated sugar and vanilla extract, continuing to beat until well combined and fluffy. Scrape down the sides of the bowl as needed.
4. Incorporate Flour & Sour Cream: Gently mix in the all-purpose flour until just combined – overmixing here can lead to a tough Cheesecake. Then, fold in the sour cream until uniform.
5. Add Eggs (One at a Time): Add the eggs one at a time, beating on low speed until just incorporated after each addition. Do not overmix once the eggs are added; overbeating introduces too much air, which can cause the Cheesecake to crack. The goal is a smooth, almost custard-like consistency for this delightful dessert.
6. Pour & Water Bath: Pour the filling over the cooled crust in the springform pan. Place the springform pan into a larger roasting pan. Fill the roasting pan with hot water until it comes about halfway up the sides of the springform pan. This water bath (bain-marie) creates a moist environment, ensuring even baking and preventing cracks.
7. Bake: Carefully transfer the roasting pan with the Cheesecake to the preheated oven. Bake for 60-75 minutes, or until the edges are set and a 2-3 inch diameter in the center still slightly jiggles when gently nudged.
8. Cool & Chill: Turn off the oven, crack open the oven door, and let the Cheesecake cool in the oven for 1 hour. This gradual cooling prevents cracking. Remove from the oven and water bath, carefully remove the foil, and let cool completely on a wire rack at room temperature. Once cooled, cover loosely with plastic wrap and refrigerate for at least 6 hours, or preferably overnight, to allow it to set fully.
Nutritional Benefits & Advantages
While often seen as an indulgence, a homemade Cheesecake can offer some surprising benefits when made with quality ingredients. Cream cheese provides calcium and protein, essential for bone health and muscle repair. Eggs contribute high-quality protein, vitamins (like B12 and D), and minerals. By making it at home, you control the type and amount of sugar, allowing for healthier alternatives or reduced quantities compared to store-bought versions. You can also incorporate whole-grain graham crackers for added fiber. Choosing organic dairy can further enhance the nutritional profile of your exquisite dessert.
Tips, Variations & Cooking Advice
- Flavor Variations: Swirl in fruit purees (raspberry, blueberry), chocolate ganache, or caramel sauce before baking for unique flavors. Add citrus zest (lemon, orange, lime) to the cream cheese mixture for a brighter taste.
- Crust Alternatives: Experiment with different cookie crumbs like Oreo, ginger snaps, or shortbread for a twist. For a gluten-free option, use gluten-free graham crackers or nut-based crusts (e.g., almond flour and butter).
- Dairy-Free: Look for high-quality dairy-free cream cheese and sour cream alternatives, easily found in many grocery stores.
- Don’t Overbake: An overbaked Cheesecake will dry out and crack. The slight jiggle in the center is key.
- Room Temperature Ingredients: Ensure all cold ingredients (cream cheese, eggs, sour cream) are at room temperature. This is crucial for a smooth, lump-free batter.
Common Mistakes to Avoid
- Overmixing the Batter: This incorporates too much air, leading to a puffy Cheesecake that will fall and crack significantly as it cools. Mix until just combined.
- Skipping the Water Bath: This results in uneven baking and often causes cracks due to the dry heat.
- Opening the Oven Door During Baking: Resist the urge! Sudden temperature changes can lead to cracking.
- Not Chilling Long Enough: Patience is a virtue here. An insufficiently chilled Cheesecake will be difficult to slice and may not have the desired firm texture.
- Greasing the Sides of the Springform Pan: This is a common mistake. The Cheesecake needs to cling to the sides to rise properly and prevent sinking.
Storage & Meal Prep Tips
Your homemade Cheesecake is a perishable dessert and needs to be stored correctly.
- Refrigeration: Store leftover Cheesecake tightly covered in the refrigerator for up to 5-7 days.
- Freezing: For longer storage, slice the Cheesecake into individual portions, wrap each slice tightly in plastic wrap, then an additional layer of aluminum foil. Freeze for up to 1-2 months. Thaw in the refrigerator overnight before serving. Do not refreeze after thawing.
Conclusion
There you have it—your comprehensive guide to crafting an unforgettable homemade Cheesecake. By following these steps and incorporating the various tips, you’re not just baking a dessert; you’re creating a masterpiece that speaks volumes of your effort and love. The true reward of this Cheesecake lies not just in its creamy texture and rich flavor, but in the joy of sharing it with loved ones. Don’t hesitate to dive in and try this recipe. Share your results in the comments below, or explore our other delightful dessert recipes for more culinary adventures!
FAQs
* A: Common reasons include overmixing the batter, overbaking, or a sudden change in temperature during cooling. Ensure room temperature ingredients, avoid overmixing, use a water bath, and cool gradually in the oven.
- Q: Can I use low-fat cream cheese?
* A: While possible, full-fat cream cheese is highly recommended for the best texture and richness. Low-fat versions can result in a less creamy and sometimes grainier Cheesecake.
* A: The edges should be set, but the inner 2-3 inches of the center should still have a slight jiggle. It will continue to set as it cools.
* A: Absolutely! In fact, preparing it a day ahead allows for optimal chilling time, resulting in a much firmer, more flavorful, and easier-to-slice Cheesecake.
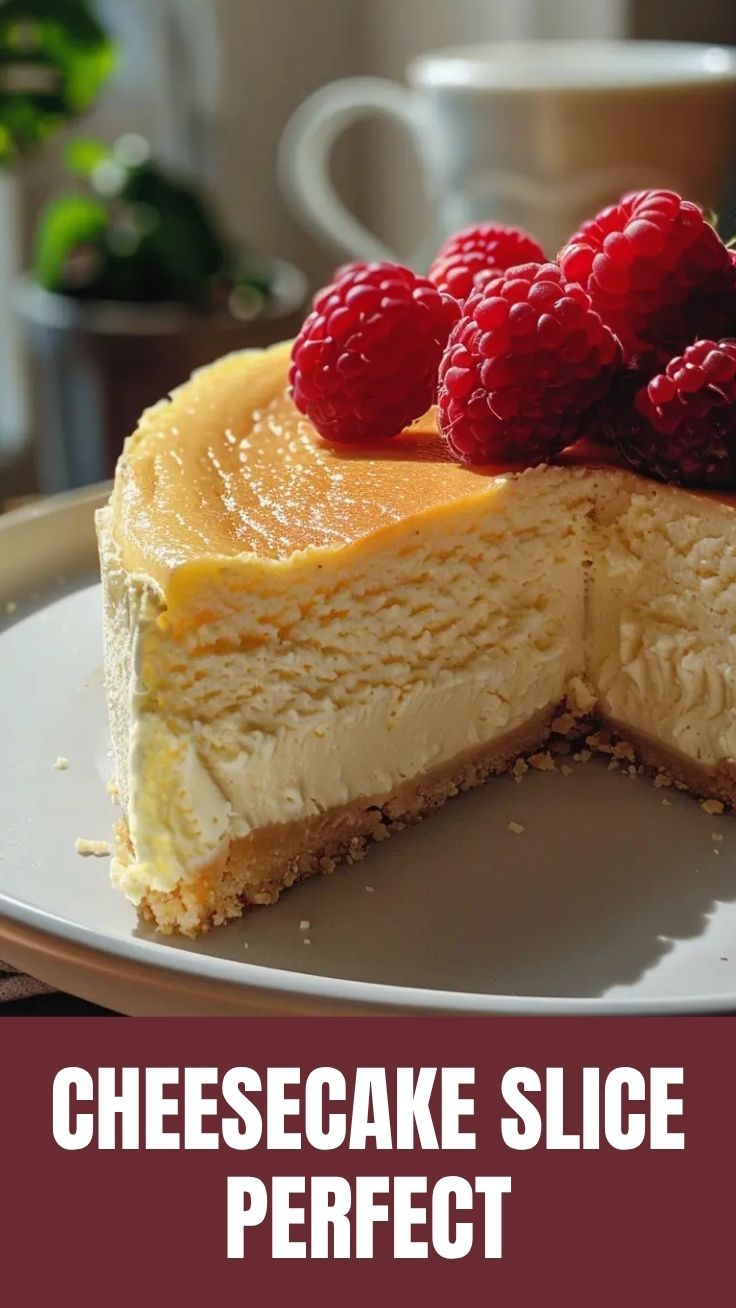
* A: Fresh berries, fruit compotes, chocolate ganache, whipped cream, caramel sauce, or a simple drizzle of lemon curd all make excellent additions.
Best way to grow the ultimate 7-layer cheesecakeCheesecake
Ingredients
Equipment
Method
- Preheat your oven to 350°F (175°C). Combine graham cracker crumbs, granulated sugar, and melted butter, then press the mixture firmly into the bottom of a 9-inch springform pan.
- In a large bowl, beat softened cream cheese and granulated sugar until smooth. Gradually mix in the eggs one at a time, then stir in sour cream and vanilla extract until fully combined.
- Pour the cheesecake filling over the crust and bake for 60-75 minutes, or until the edges are set and the center jiggles slightly. Turn off the oven and let the cheesecake cool inside with the door slightly ajar for one hour, then remove and chill for at least 4 hours, or preferably overnight.
- Once the cheesecake is chilled, melt chocolate chips and heavy cream together, then spread this mixture evenly over the cooled cheesecake.
- Carefully drizzle caramel sauce over the chocolate layer, ensuring an even coating.
- Sprinkle chopped pecans evenly over the caramel layer.
- Whip heavy cream and powdered sugar together until stiff peaks form. Spread the whipped cream over the nut layer.
- Garnish with chocolate shavings and an additional caramel drizzle just before serving. Slice and enjoy your ultimate 7-layer cheesecake!